
DIY Modern Wood Pergola
This post does contain affiliate links. By clicking the link and making a purchase we receive a small commission at no additional cost to you! This helps us keep the lights on and continue to bring you great content.
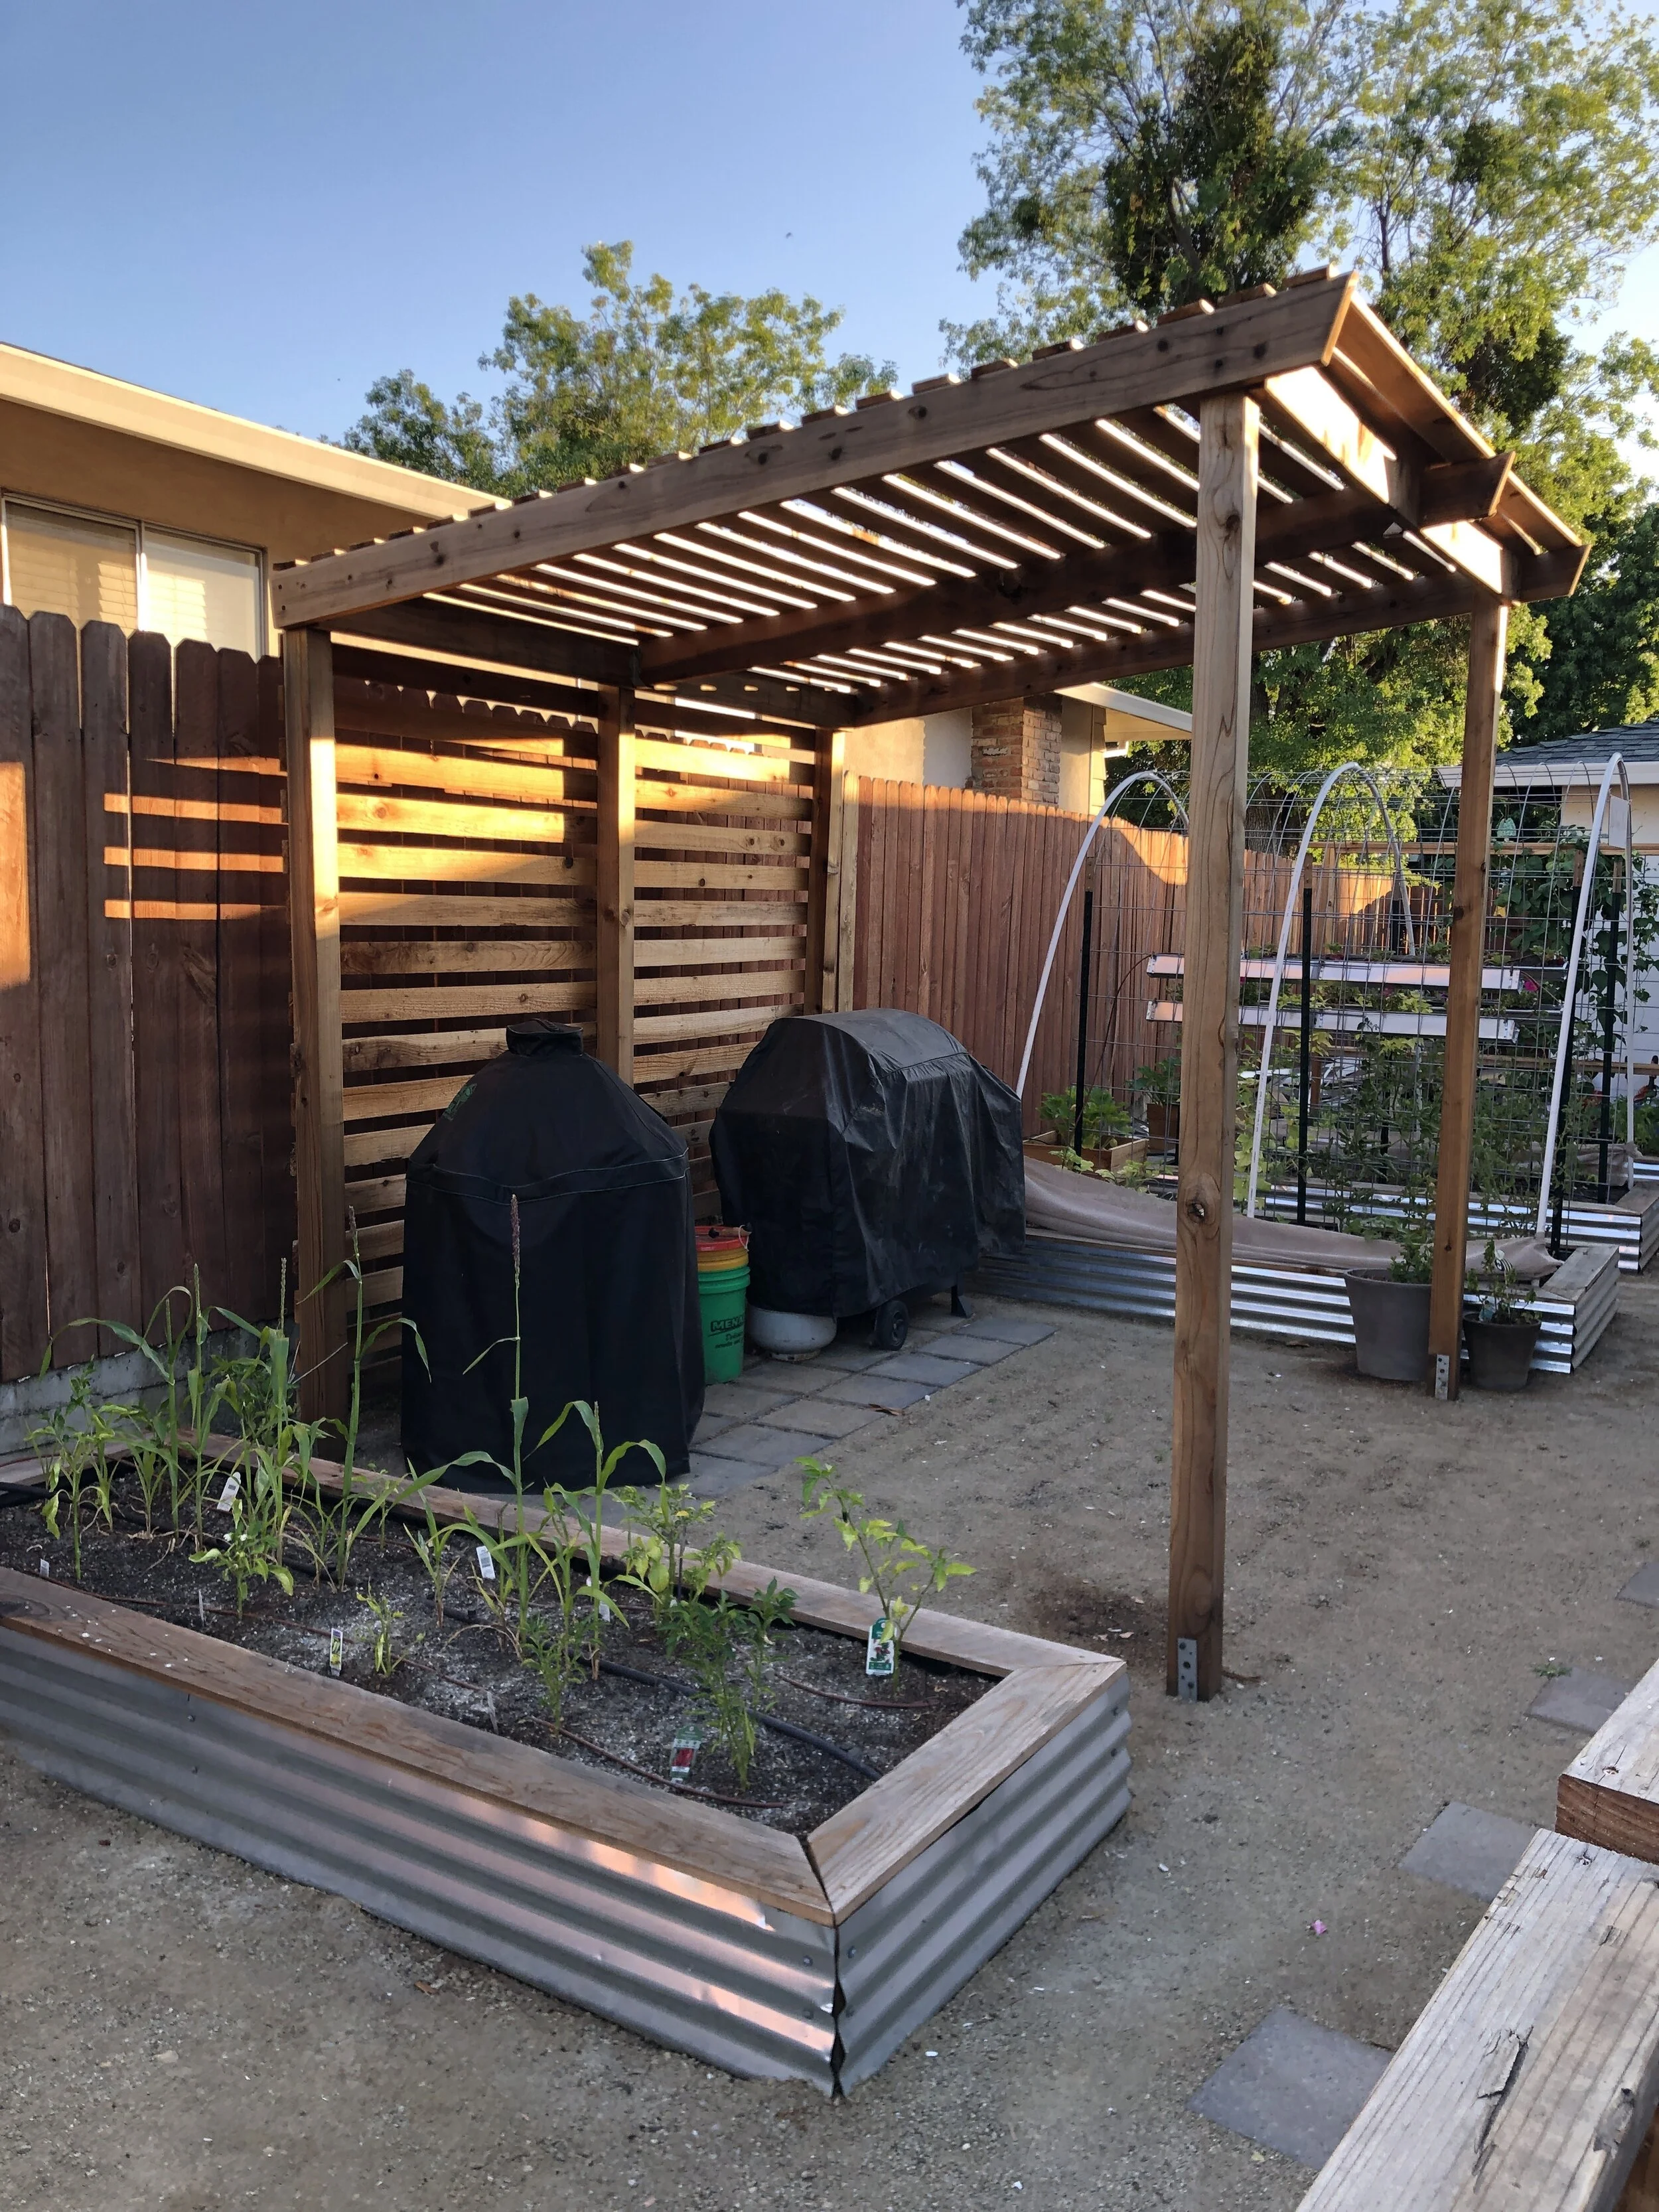
Pergolas are a great addition for any yard. When designing our garden space we wanted to add a statement piece that made the garden feel homey. The pergola not only is functional in adding shade to our outdoor kitchen space, but acts as a focal point. Our pergola is a simple modern design with an angled top (8’ sloping up to 9’), and is 9 feet wide by 8 feet deep. We used 4x4s for the posts, 2x6s for the bracing, and then added 1x4s for the ceiling and back wall. This job costs around $600, takes two sets of hands and can be done in a weekend.
In this post we explain the details in how we built our pergola. We give you a shopping list and break down the process into 7 easy steps. Please note, your shopping list and cost may differ based on your location, and we do encourage you to adjust the size based on your space, but we hope this guide will give you the framework and inspiration to do it yourself! Keep reading and we will explain in 7 easy steps how to build a pergola with a modern twist for your backyard!
A few things to consider before building a pergola:
Check with your city or county to determine if you require a building permit. We have run into issues in the past where we didn’t think a permit was required, only to find out it was and we had to rebuild everything. So now I always recommend checking prior to beginning your build. Some counties also have easement restrictions which may limit where the structure can be built.
The way you secure the four posts into the ground really depends on the area you live. If you live in a region where the ground freezes, posts will need to be buried below the frost line. In warmer areas, you can secure the posts into the ground with concrete piers with post straps to ensure the structure is stable and won’t blow over with the wind.
Once you have determined the location and size of your pergola, you’ll need to go shopping and make sure you have all the materials needed! We decided to use Redwood for it’s natural rot resistant qualities. Cedar is also a great choice. If you decide to use pressure treated lumbar, you may need to opt to stain it once the wood cures. For the frame, we used 4 corner posts and added a 5th along the back for added support of the 1x4s. The 2x6” joists connect the vertical posts and act as support for the ceiling.
For a 8’ L x 9’ W x 9’ H pergola, you will need:

x5 4x4x10’ Redwood (for the supporting posts)
x5 2x6x10’ Redwood(for the bracing/joists)
x37 1x4x10’ Redwood (for ceiling & back)
x5 concrete pier with strap block
x2 joist hangers
x1 box of 2 1/2” lag screw (for the structure)
x1 box of 1 1/4” wood screws (for the 1x4s)
x2 bags of gravel
Drill
Circular Saw or Chop Saw
Level
Tape Measure
Shovel
*Note, that not all lumbar yards have 10’ pieces, depending on the size your going to build you may need to adjust and purchase 12 footers and cut to size.
Now that you have all the materials it’s time to get to work!
STEP 1:
Lay out the 4x4 posts and cut to your desired height. To accommodate a slopped ceiling like ours, cut the back three posts at 90 degrees to 8 feet and the front two at 90 degrees to 9 feet.
STEP 2:
Mark the ground where you will place the four corners. Be sure to place the outside strap edge to the desired width and dig each spot down the depth of the concrete pier plus a few extra inches (approximately 10-12”). You want to lay about two inches of gravel down under the block to help with drainage and ensure each block is level. Then attach the 4x4 to the straps using lag screws and back-fill the hole being sure to tamper the dirt. It may be helpful to use some scrap lumber to support the 4x4s while building the structure to ensure they remain plumb and level. Since we live in northern California where we don’t have to worry about the ground freezing, we secured our posts with concrete piers that have securing straps. If you live in an area with a frost line you will need to dig to that depth and bury the post in order to prevent heaving.

STEP 3:
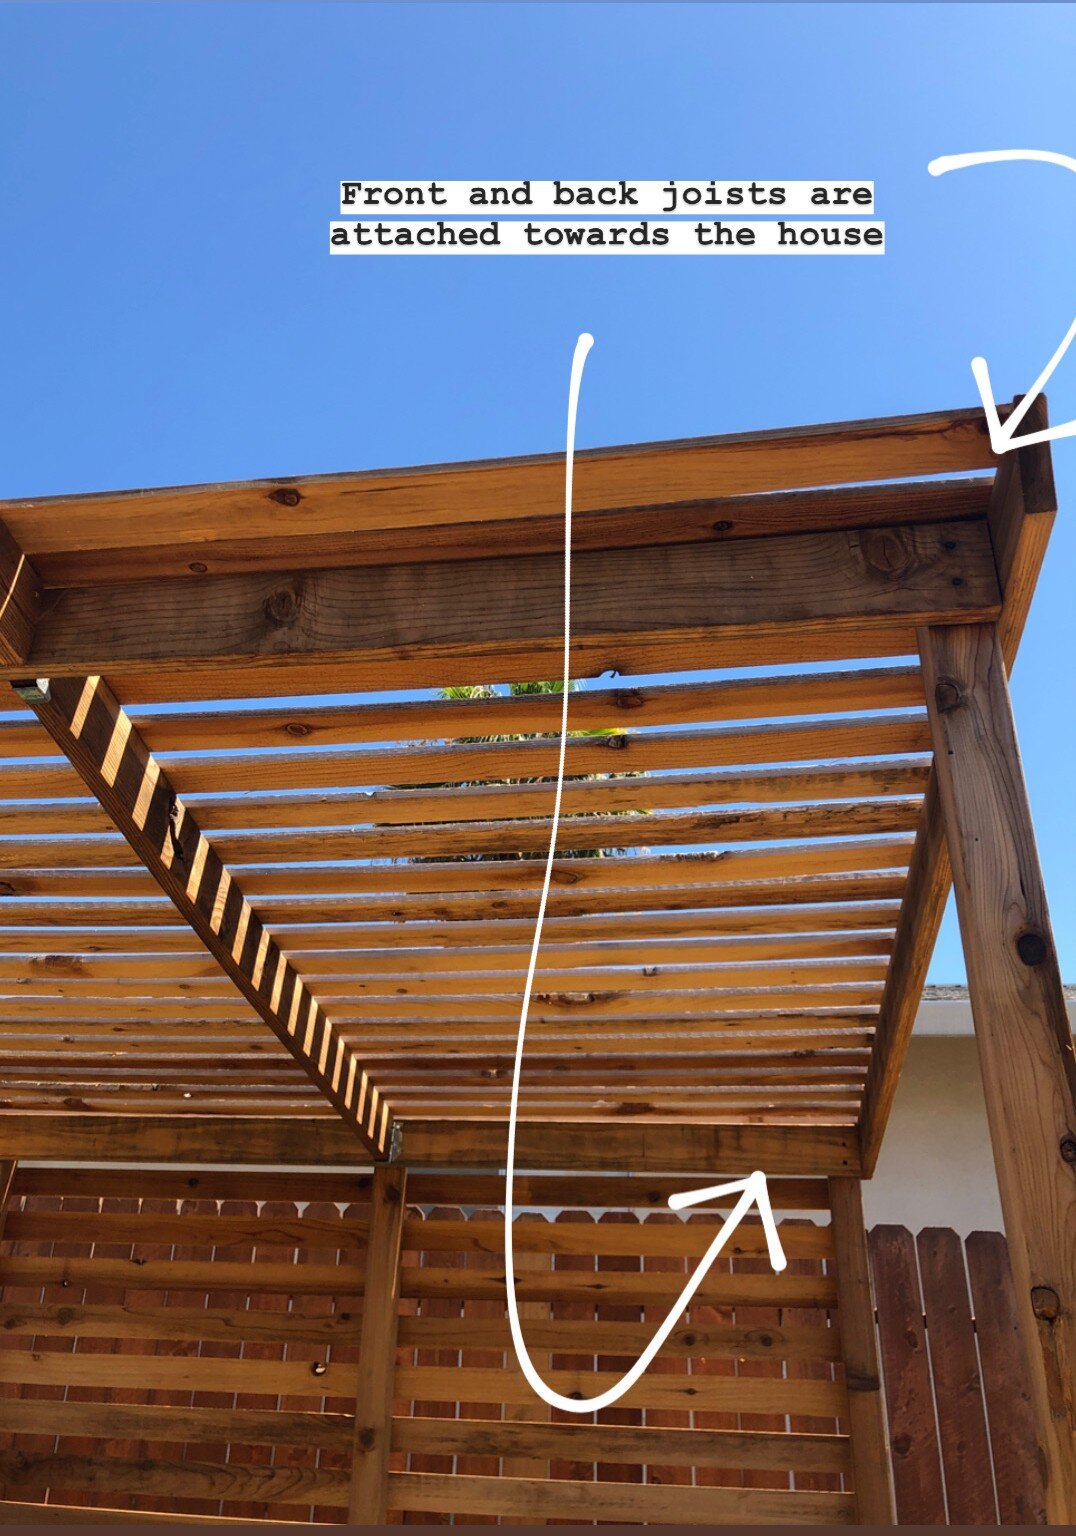
Next, take (2) 2x6” joists for the front and back pieces and cut to 9’ (or your desired width). Align these 2x6s with the top and outside edges of the 4x4s and secure with lag screws. *Ensure that your posts are plumb and level prior to screwing in the lags. This is where and extra set of hands really come in to play!
TIP: depending on the location your pergola faces, we recommend attaching the front and back joists towards your house for better asthetics (hiding the 4x4s so we always saw the finished wood).
STEP 4:
Next, take (2) more 2x6” joists, for the left and right sides. First determine the desired overhang you’d like in the front; ours is 12” making these joists measure 9’ in length. Cut joist to size then cut the front edge at a 45 degree angle to give a finished look. Secure joist to the 4x4s on the outside of the pergola using lag screws.

STEP 5:
The last 2x6 will be attached to the center of the pergola. First measure and hang the two joist hangers to be centered along the back 4x4 and to the middle of the front joist. Then, cut the 2x6 to size, for ours this is 8’. With the excess end, measure the overhang from a side joist (from the 4x4 to the edge) to match (should be about 12”), cut to size and then cut front edge at a 45 degree angle, and secure to the front of the joist using regular wood screws.

Your framework is complete! Now onto making it pretty.

STEP 6:
For our design, we wanted the 1x4s to appear like its ‘wrapping around’ the back and top of the pergola. To achieve this look, we attached the 1x4s to the top and outside of the framework. Begin by measuring your framework and determine the length each piece will need to be cut to (ours is 9’). I recommend cutting a few pieces, hanging them, and remeasuring as you go (just in case you get off on a measurement somewhere). We left a 2” gap between boards and used 1 1/4” wood screws to secure.
Tip: cut a couple pieces of excess wood to your desired gap size for an easy way to measure while you install the 1x4s to ensure consistency.
Step 7:
Enjoy your pergola! Once the wood cures (which can take months), you can apply a wood sealant to protect your latest project against the elements. I’ve had good luck with Thompson’s Water Seal in clear.

Thanks for reading! We hope this step-by-step guide helps you in preparing and building a pergola for your yard! If you have any questions reach out or comment below. If you like our guide, don’t forget to share us on Pinterest, Instagram and Facebook! As always, happy building!
-Lucas & Beth

